Thursday 31 May 2012

Goodbye Round, Hello Squoval!

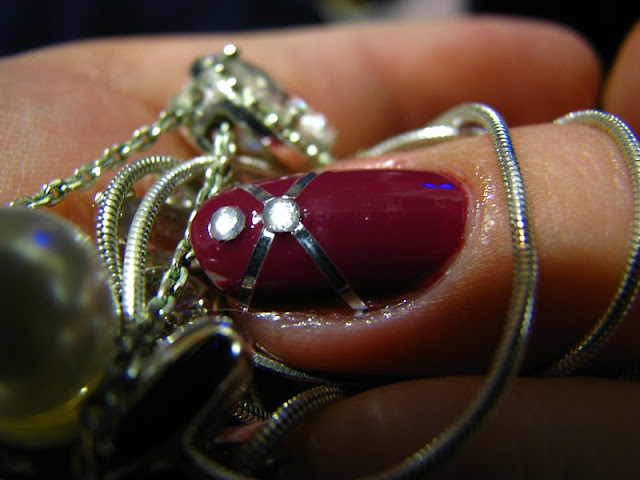
Hiya lovely people! A quick post of a plain mani today. While taking the pics for yesterday's Pink Wednesday post I decided I didn't like the shape of my nails, so I've cut them all off! I didn't mean for them to be so short, but that's how short they became as I tried to get the new shape right. I've tried to go for 'squoval' - square across the tip with rounded off corners - but it's gonna take me some practice to get it right! Before I filed all my nails off, I bought two new BYS nail polishes, and I loved the dark red so much that when I put it on, I just left it plain. So that's what ya've got for today's post! Behold the nubbin nails!
 
This is Glamourpuss by BYS. In my tungsten-lit bedroom it looks almost chocolate brown, which made me worry a bit when I put it on last night, but I decided to keep faith and lo and behold, in daylight it is the most delicious deep dark cherry red I've ever owned. Absolutely smitten with this colour - I don't know how I'll bear to take it off!
 
It's deep and dark but not at all gothic-y which is always a worry with 'blood reds', and there's something underlying in this shade that keeps it out of the tween zone. I've tried (and failed) once before to do a 'splatter mani' with blue over white having seen it done with red over white for a gore-y Halloween mani, but the blue did NOT go well at all. It looked like I'd dropped the pot while playing with paint. But now that I have the perfect blood red, I can't wait to play with splattering again! 


Do you like dark colours on short nails or prefer nudes on your nubbins'? Do you favour the old long n' round nail shape over the new short n' square? Hopefully I'll get better at shaping them! Gimme your feedback, people, I love to hear from you =D 


- Ally xx

Wednesday 30 May 2012

Gone Dotty

Happy mid-week, lovelies! It's Wednesday, and On Wednesdays We Wear Pink, so I have a playful polka-dotted pink mani, which I'm actually enjoying wearing more than I thought I would! It's a bit funky, bit retro, bit bright, bit... well you'll see =D. My 'ingredients' looked so cute all lined up last night so I snapped a quick pic. 
From left to right: OPI Sweet Heart, Sparrow Me The Drama, Strawberry Margarita, BYS French White and as always, my Seche Vite top coat. In the back right corner you can see my base coat, Avon Nail Experts 24k Gold Strength peeking out for a bit of attention too. My nails can be really brittle and they split easily and peel sometimes, so a strengthening base coat is a must for me. The 24k one has been a blessing - even my thumb nails have stopped splitting and they've been useless since I don't know when! If you're a polish junkie, a good strong base coat is a must. Having said that, if you're a polish junkie, you already knew that ;-). 
Two coats of BYS French White for my background, then using my second to largest dotting tool I applied my best and brightest pink, OPI Strawberry Margarita, down the centre of each nail. No accent nails today, sorry, I thought these were busy enough on their own! Either side of SM I dotted on Sparrow Me The Drama which I haven't used before, and came out more purple than I would've like but nice effect all the same! Outside-a that came Sweet Heart. You can barely see it, and I would've liked it to've been a bit more obvious, but it works really well IRL despite being darn near invisible in the pics. 
Dots dots dots... and some crappy cuticles...
All topped off with the ever wonderful Seche Vite top coat. I don't know how my nail polish survived before I got this top coat. On many occasions, it didn't. An ultra quick drying top coat is strongly recommended to anyone who has a life, and to those of you who barely do (like me...) it's still a pretty handy tool to have hangin' about.
This is my nearly-empty bottle of Sweet Heart. I used to use it to death as my french pink, but I've moved on to OPI Barre My Soul from the NYC Ballet Collection. BMS is just... Perfect. Just. Perfect. Favourite pastel-y nude of the moment. Surprisingly versatile! Ahem, back to today... So I'm kinda loving the polka dots more than I thought I would, and the $10 I spent on my 5 dotting tolls has more than paid itself off. Can't wait to try this mani with different colours... It's great how a Pink Wednesday mani can inspire a rest-of-the-week mani. 


How about you, do you like the dots or are you "like, totally" over them? Oh, also, white nail polish: for or against? Personally I hate the 'white-out' look but it's a useful base colour under other stuff. Thoughts on white nail polish? Keep checkin' in, babes, more goodies coming soon. =D


- Ally xx

Tuesday 29 May 2012

Sponging and Sparkle and Dots, oh my!

Hello hello, you wonderful people. A late one today, m'fraid. Haven't been feeling my best and brightest for the last couple of days so inspiration's lacking a tad. I've been wearing today's mani since Sunday night, half because I love it and half because I'm always hesitant to take glitter polish off. I'm yet to try the foil method but it may just be the answer to my glitter-polish-removal prayers! While I'm linking, I might just mention the incredible Nailasaurus - a truly talented young lady who is a constant source of inspiration and amazement! Anywho, pics!
The decision to do this mani went something like this: Scene: about 1am, Monday morning.
Me: "Mum, I don't know what colour to do my nails..."
Mum: "I don't know either. I'm just going to do two coats of Tickle My France-y and go to sleep."
Me: "Mum! I can't pick a colour! Help!"
Mum: "What?"
Me: "Pick a colour!"
Mum: "Purple!"
Me: "Okay!"
And the mani was decided. We're so very civilised in this house. Thankfully, my ever amazing mother is almost as nail-obsessed as I am!
On the tips I sponged a gradient with OPI Plugged-In Plum. This surprised me - the colour looks nothing like it does when applied straight. It's a lot wine-y-er than I'm used to from this colour, but I quite like it. The darkish redish purple makes it look quite gruesome in daylight, which is kinda cool. I added 4 dots down the side in receding size in OPI Birthday Babe. It may be useless for stamping, but it's great for dotting! 
Over the top I applied one coat of BYS Starlette for a bit o' sparkly goodness. I find the glitter top coat helps to smooth everything out a bit and hides some of the not so perfect sponged gradient. And it's glitter. Glitter is good. Until you have to remove it... 

It was at this point in my photo taking that my cat Dog decided he was more important than what I was doing, and that he deserved all my attention. Sorry about the terrible focus for these photos, but my camera wasn't prepared for all that fur!
Dog helped me discover that the mani is also tasty. Something I wouldn't have thought of without him. Thanks, Dog. 
Thus concludes the post. How do you usually remove glitter polish? Does the troublesome removal make you think twice about applying it? Ever had a polish that changed colour depending on how you applied it? I'd love your comments, I like to know I'm not alone ;-). Until next time, lovely people!

- Ally xx

Sunday 27 May 2012

Bit o' Bling

Happy Sunday, lovely people! Hope you all got a chance to pop your feet up for a bit this weekend! The weather's just turned miserable again here - perfect for a lazy Sunday of movie watching. Today's mani features my favourite go-to Winter colour, OPI No Spain No Gain. It is very similar to OPI Miami Beet which I also own and didn't go a day without last Winter, but since getting NSNG, I've preferred it. It's a little warmer and a little more purple and a little... newer, I guess? I haven't worn this to death (yet!) so it's still fresh to me. 
With a little help from my rhinestone wheel and new rolls of tape, I added a bit of bling to the lovely warm base colour. I really love the contrast of silver with NSNG, but as you can see on my ring finger, the only solid silver polish I have isn't so great with the stamping so it's a bit of a fail. The stamp is BundleMonster no. 07 (a stamp I received accidentally after ordering 207...) in OPI Birthday Babe. I have a soft spot for Birthday Babe because I got it the the day before my 20th birthday, and wore it the next day to an unexpected job interview at a jewellery store, and I got the job! It takes a few coats for me to get it streak-free and properly opaque so I knew it wouldn't stamp well, but I had to try!
You can see that I had tape across the tip of my accent fingers, but I didn't love it when I woke up this morning so I picked it off. There was something just a bit too random about the placement. From a distance you can't see the gap where the tape was, and another top coat pretty much made it disappear, so no harm done. 
And a random art-y macro shot for good measure. I only just noticed it shows perfectly where I took a chunk out of the base colour with my scissors while snipping the tape to size. Oops! Ah well, I still think it's pretty gorgeous. What girl doesn't enjoy a bit of glitz from time to time? Personally I'm addicted to it - you can blame my mother for my love of all things shiny!


Well, whaddaya think? If any of you know a really good saturated / dense silver that could stand up to stamping, please let me know in the comments. I'd love your feedback, you lovely people! Thanks for stopping by =]


- Ally xx

Saturday 26 May 2012

You're Blushing!

Happy Saturday, lovely people! Hope your weekend is off to a lovely relaxing start :). Today I have a mani using one of my Mommy's most recent purchases: ORLY You're Blushing. I was interested to see how different this was from OPI Steady As She Rose because in the bottle they look quite similar.
                           
I don't really do swatches and I'm not likely to do many in the future because I'm in New Zealand, and we tend to get all the colours a lot later than all you American / Canadian bloggers, so you beat me to it! You incredible ladies do it better anyway ;-).

For this mani I did two coats of ORLY You're Blushing on my thumb, index, middle and pinky fingers, and two coats of OPI Alpine Snow on my ring fingers. I dotted some daisies on my ring fingers in You're Blushing with accents in OPI Glitzerland.
On my thumb I dotted some daisies in OPI Alpine Snow. I think these are super cute!
I did this mani last night and took the photos this afternoon, and you can already see some tip chips :(. I use Seche Vite over all my manis and it tends to make the polish shrink which doesn't do much to prevent tip chipping. According to my most wonderful Mum, one coat of this over the OPI Ridge Filler is chip-proof and long wearing. I'll have to take her word for that because my two thicker coats were very satisfying to peel off!

 And a close up of the dotty daisies. This polish is very different from Steady As She Rose out of the bottle. The formula on You're Blushing is a lot more saturated and reaches full opacity faster, while smoothing itself out to a perfect creme finish on the first coat. SASR can be a bit streaky on the first coat, only smoothing out on the second. The colours are hugely different as well, with SASR having a much stronger light grey tone. If any of you know OPI Tickle My France-y (the most perfect polish in existence), You're Blushing is very much a purple-tinted version of that. 


Thoughts? Comments? Any tips on keeping my polish from shrinking under Seche Vite? As always, thanks for stopping by =).


- Ally xx


Thursday 24 May 2012

Purple on purple

Hello lovely people, happy Thursday! Winding down to the weekend, wahoo! I have some photos that some of you will have seen before as I published them on Facebook before this blog existed. I wore this mani for ages because there's just something nice and simple about it, and I was a bit pleased with myself for the stamping - it wasn't a complete disaster! Pics...
 Two coats of OPI Steady As She Rose as my base colour, stamped with a BundleMonster plate (can't remember which one, and I'm at uni so I can't check...) in OPI Lincoln Park After Dark. This is essentially the full-nail non-taped version of the mani in 'A lil bit o' elegance'. I obviously like the pairing of these colours!
 
Sorry for such a short post, but I'm aware some of you have seen this before so wanted to keep it sweet! Which do you guys prefer, the full nail or the taped off tip? I know which one's easier to do! Thank you as always for stopping by =]


- Ally xx

Wednesday 23 May 2012

Pink Wednesday

Hello again you lovely lovely people! Just a quickie today. Although I'm not technically a part of it (though in the future I hope to become so), a wonderful bunch of ladies in the nail polish blogosphere adhere to an idea taken from Mean Girls: On Wednesdays We Wear Pink. I think this is a great idea so have done my first Pink Wednesday using the very first pink OPI polish I bought way back when. Sorry about the fur in these pics! My cat Dog decided to help me with the photos today...
The base colour is 2 coats of the brightest, yummiest, most classic pink polish I have - OPI Strawberry Margarita. There's just something about this polish that is special to me, I don't really know what it is but it warms me. It's such a bright colour! I muted it a bit by stamping BundleMonster plate 212 over it in BYS Black Satin, which as you can tell by now is my go-to black polish for all details. I filled in the 'eyes' of the stamp with a dotting tool with Black Satin and BYS Drop In The Ocean for just a bit of contrast. 
 It's been a long while since I've worn anything this bright and playful, but I'm totally diggin' it.
So there it is, my first Pink Wednesday, possibly of many. What do you reckon? Loving the bright pink or do you generally go for more muted tones? Think I should've used a colour other than blue for contrast? I'd love your feedback, my beautiful readers! 


Keep smiling, lovelies. See you soon!


- Ally xx

Tuesday 22 May 2012

Rock Starlette

Hello lovely people! Sorry I don't post anything yesterday - Mondays are a busy day as far as lecturers and assignments go! And today's is a tad late because I've had a massive migraine all day today =( complete with vision loss and vomiting and all the fun stuff, so I had to wait 'til everything settled down before snapping pics. 


Here in New Zealand, May is NZ Music Month so with not that many days left in the month, I thought I should do at least one musical themed mani! I'm part of the cast of Hairspray that is opening in Wellington in August and we're in the full throes of rehearsal at the moment - this mani went down a treat with all the lovely ladies (and gents...) who are singin' and dancin' their hearts out in preparation! Without further ado...
 I started with four thin coats of OPI My Pointe Exactly from the NYC Ballet collection. Ballet + music kinda go hand in hand, no? I'm not usually a grey nails kinda gal but I absolutely LOVE this grey sheer creme-y jelly - it's everything you could want in a polish. I added two coats of Pirouette My Whistle from the same collection on my index, middle and pinky fingers to add some glitz n' glam, and because it's such a stunning glitter. Layered over My Pointe Exactly, the silver micro glitter fades into the grey creme and the white hexes catch the light like you wouldn't believe. Perfection in glitter form. 
On my ring fingers I used a small dotting tool and BYS Black Satin to free-hand a couple of quavers (or quarter notes for you Americans) and accented them with small black rhinestones. After adding the gems I realised they were a bit surplus to requirements as the pattern look exactly the same but still, any excuse for more bling!
On my thumbs I did clefs - treble on my left and bass on the right. 
I did the treble clef first then thought 'there's no way I can do that with my left hand!' so opted for the simpler design of the bass clef on my right thumb.
I really like the simplicity of this mani - I've been wearing it since Sunday night, and not only because I haven't really had time to change it! A little bit sad to see it go, but onwards! Looking forward to what tomorrow has to offer! Thanks for checkin' in, babes =D


- Ally xx 

Sunday 20 May 2012

A lil' bit o' elegance

Hiya! Hope you're having a wonderful weekend! We finally got a little bit of sunshine here today but the temperature's still dropping so Winter is definitely on its way. I can always tell how cold it's going to be by how many cats are on my bed! Last night was a chilly one...
 Now for the nails. My nail tape arrived the other day (I bought a set of 10 colours for around $7 on Trade Me [an NZ online auction website]) and I had to play with it! The design I chose is one that I came across on a blog but I can't recall which one so I can't link back to it =(. If anyone knows, feel free to comment so I can give credit where credit is due!
Edit: My wonderful friend Megan reminded me that this design was from ChitChatNails and I remembered it completely wrong! I thought it was done in all nudes/sheers with rose tape, but it's grey on grey with red! Click here to see the stunning original. Thanks Megan! =D


A quick technical note: I always put some baking paper down on whatever surface I'm doing my nails on to protect the surface from mess / damage. I've spilt too much polish remover on too many wooden surfaces not to learn from my mistakes! The baking paper is perfect as it doesn't absorb anything, so spills are easy to clean up, and you can wipe it clean with a tissue.
For the mani I applied 2 coats of my base colour, OPI Steady As She Rose from the Pirates of the Caribbean collection. 
Love this colour and not just because I love purple. The grey-ish tint that comes through in this purple creme makes it less garish and more every day. Over that I taped my tips off on an angle and stamped with the BundleMonster plate BM21 in OPI Lincoln Park After Dark - my favourite stamping polish! The polish itself comes out almost black on my very pale fingers, but as a stamp it's a lovely plummy deep purple.
Time for tape! It took a few fingers to get the hang of it as the tape is sooo tiny that my big clumsy fingers didn't seem to agree with it too much, but the result isn't so bad IMO. It adds that little bit of a finishing touch to bring everything together. Before I applied the tape, it just looked like I'd tried to stamp a french-tip style and got the stamp horribly wonky. Outlining it in a complementing colour made it look on-purpose, which it was, I swear! 
Everything topped off with a coat of Seche Vite.

The mani that inspired this one was done in nude colours, with a pink sheer underneath and a sheer silvery-white stamp, with the taping in a dusky rose. Very very elegant and would not be out of place as a bridal look. Looking through the tape, I couldn't resist the purple so I changed the other colours to match.
What do you guys reckon? Like the darker stronger colours or prefer it in nudes and sheers? 


Enjoy the rest of your weekend! Stop by again soon =D


- Ally xx

Saturday 19 May 2012

More Room for the Blues

Hiya again, and happy Saturday! To continue on from yesterday's blue-ness, today I've got some blue butterfly nails for you. It's a sponge gradient underneath some (very very badly done, sorry) free-hand lines, topped off with white dots for effect. I've previously done this design in orange/red and am not sure which I prefer. We've been raising and looking after some Monarch butterflies here over the Summer, and they're so late in season this year that 2 weeks out from Winter we still have chrysalises! I love the colour in their beautiful delicate wings, and when I stumbled upon this tutorial, I had to try it! So today's manicure is a variation on that. Will post the orange/red version at the bottom so you guys can see which you prefer. Onto the photos!
Sorry again about the really terrible free-handed lines. Watch the tutorial for a MUCH better version! From a bit further away the effect isn't so bad. 

These are the same polishes I used yesterday: OPI I Vant To Be A-Lone Star, the mini Miki polish No. 24 for lack of a better name, and BYS Drop In The Ocean. I painted on the lightest blue as my base colour, 3 coats, then using a cheap make-up sponge wedge sponged the medium blue over it about two thirds up the nail, let that dry and sponged the darker blue on just the last third of my nail. The black lines are in BYS Black Satin, and the white dots (of which there are meant to be bigger and smaller ones) in OPI Alpine Snow - my favourite go-to white for everything from dots to french tips. Everything finished off with a coat of Seche Vite, my brand new quick-drying top coat! I know so many bloggers and nail artists who swear by it, and it definitely lives up to the hype! Such a quick dry.
I left my right hand clear of the lines, mostly because it was late-ish and I knew they weren't going to go well. I am not ambidextrous. Actually don't mind them plain at all, but if I was going to keep them I'd add a blue glitter like OPI Last Friday Night over top to smooth everything out.
You can see little clumps of the sponge on my ring finger that I forgot to take off before top coating. Oops!
 Close up shot of the least drunken looking lines. 
And here's the promised shot of the orange/red original. This was before I bought myself a brush, so I did all the lines with a dotting tool! Rather time consuming, especially with my non-dominant hand! Also added a pink shimmer over the gradient that's absent in the new blue one. This shot was taken inside at night so my hand is leaning towards The Simpsons in hue, but you get an idea of the mani. 
And a comparison. What do you guys think? Blue or orange work out better? 

And that's it from me for today! Gonna go take my wings off and pick a mani for tomorrow... Hmmm...
Thanks for stopping by! =D

- Ally xx